Cranberry and Orange Summer Punch

Try this simple non-alcoholic recipe and make a simple yet refreshing summer punch for parties in no time! All you need is 3-ingredients and 5 minutes to make it!

Orange and Cranberry Summer Punch

Hello hello! So summer is here and so am I with a really simple recipe to make punch at home with only 3 ingredients! This Cranberry and Orange Punch is seriously summery and is oh-so easy to make. If you’re having a party this summer then you NEED to have this (with a splash of Vodka of course). It’s really refreshing and I’m sure will go down really well with all your guests..especially the girls!

Summer Punch Recipe

RECIPE: Cranberry and Orange Summer Punch

Makes: 1.5 L/1 jug       Time: 5 minutes

INGREDIENTS

  • Cranberry Juice, 3 cups or 720 ml
  • Orange Juice, 1/2 cup or 120 ml
  • Ginger Ale, 500 ml
  • Sliced Oranges and Lemons

METHOD

In a jug mix cranberry juice, orange juice and ginger ale and give it a stir.

Line the bottom of a serving bowl with sliced oranges and lemons. Pour the punch from the jug on top and serve immediately.

If you’re going to make it before a party, then mix cranberry and orange juice beforehand but pour ginger ale right before serving so that it doesn’t lose it’s fizz.

TIP: Make ice cubes from the punch to keep it cold without watering it down.

Summer Punch Recipe

Looking for similar recipes? Try these..

Apple Ginger Lemonade

Apple Ginger Lemonade


Masala Coke Cocktail

Masala Coke Cocktail


Frozen Strawberry Daiquiri

Frozen Strawberry Daiquiri


Homemade Deep Dish Pizza – Instapizza Style

Learn how to make Deep Dish Pizza with step-by-step instructions! Try this amazing recipe and make insanely good deep dish pizzas at home! 

Homemade Deep Dish Pizza

Last week I got a chance to go visit Instapizza and try out everything on their menu, yes lucky me! This small (but soon to be really big) pizza chain is a hidden gem with pizzas to die for. I’m proud to report that Delhi finally has a decent enough place that delivers pizzas that don’t taste like cardboard. Yes, this place is a pizza lovers dream come true with it’s vast (and I mean it) variety of toppings. You name it and they have it! Pile your pizzas all you want and you will still walk out paying an amount that won’t burn a hole into your pocket. Lucky are those people who live in G town and kalkaji because that’s where they’re currently situated. Pray to god that these people expand soon and open one outlet near your home (and mine) so that we can finally say goodbye to Dominos!

 Homemade Deep Dish Pizza DSC_1158 DSC_1137
Homemade Deep Dish Pizza
I don’t normally review places but Instapizza deserves a special mention because of the quality of their pizzas. I tried the chicken pepperoni, garlic and jalapeño pizza and DIED. I was expecting a regular tasting pizza (because that’s what you expect from a chain) but this one blew my mind, in a pleasant way. Everything was perfect, the crust, the sauce, the toppings..It was so good I ended up eating a piping hot slice and burnt the roof of my mouth..ouch!! 😀 I also tried a deep dish pizza which was more like a pizza pie. That pizza was about 2 inches thick and enough to feed a tribe (no, really!). Ashwin (the owner) was kind enough to give me the recipe (the home version ofcourse) and here I am..ready to share it with you!!
Homemade Deep Dish Pizza Homemade Deep Dish Pizza
 Now this pizza is not like a regular pizza..so you will need a few “equipments”. At Instapizza it’s made in a lose bottom or a springform tin because otherwise it would be impossible to take it out but for all of you home bakers you can just bake it in any cake tin or pie dish and serve it like that. You need to cover your tin with pizza dough, like you’re making a pie and then load it up with cheese and your preferred toppings. I’m going with Salami, jalapeños and red onions today. Then you cover the pizza with another layer of dough and sauce (which btw is also an instapizza recipe) and bake it in a REALLY HOT oven for about 35 minutes. Before you turn around and be like “who’s going to do all that hardwork” let me just tell you..making this pizza is going to be one of the best decisions of your life. You will thank me for sharing this recipe! So bake it and let me know what you think!
Homemade Deep Dish Pizza

RECIPE: Homemade Deep Dish Pizza – Instapizza Style

Makes: One 8″ Deep Dish Pizza        Prep Time: 1 1/2 hours + overnight proofing     Baking Time: 35-40 minutes

INGREDIENTS:

For the dough
  • Active Dry Yeast, 2 1/2 teaspoons
  • All Purpose Flour (or maida), 3 1/2 cups or 450 grams approx.
  • Sugar, 1/2 teaspoon + 2 tablespoons (preferably caster)
  • Olive Oil, 2 tablespoons
  • Water, 1 1/3 cup or 320 ml

For the pizza

  • Fresh Mozzarella, 1 cup (grated)
  • Preferred Toppings (I used onions, peppers, salami and Jalapeno)
  • Pizza Sauce, 1 cup (Recipe here)
  • Jalapenos or Basil, for the top

METHOD:

Start by preparing your dough.

(Read this post before you start if you’re a beginner and a first timer with yeast. It’s important!)

In a cup of lukewarm water, add 1/2 teaspoon of sugar and mix it in. Add in the active dry yeast and stir. Cover the cup/glass with cling film for about 10-15 minutes of until the top is foamy. (Refer to pictures here.)

In the meanwhile, mix flour, olive oil, 2 tablespoons of sugar in a bowl and set aside.

Once your yeast has proofed (i.e. it’s foamy), add it to the flour mix and knead until just combined (about 3 minutes). Once you no longer see dry flour, stop, cover the bowl with cling film or a damp cloth and let the dough rest for 15 minutes.

Homemade Deep Dish Pizza Homemade Deep Dish Pizza Homemade Deep Dish Pizza

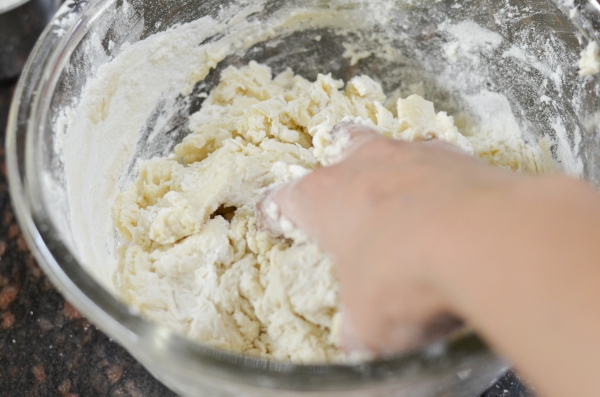
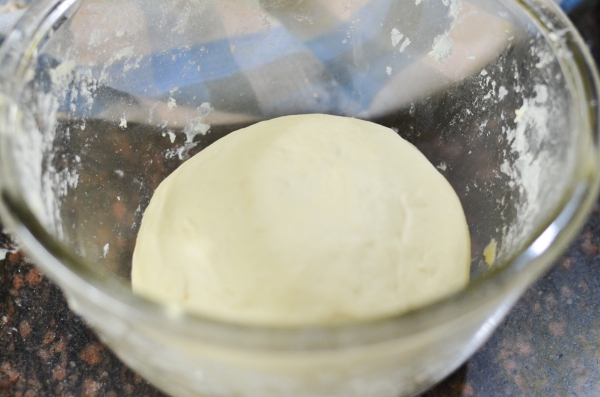
Uncover the dough and tip it on a floured surface, knead it for about 4-5 minutes or until the surface of the dough bounces back when you poke it.

Cut the dough into two pieces and transfer to a floured tray or individual bowls. Cover with cling film and put it in the refrigerator for at least 8 hours (or overnight. I kept mine for about 13 hours, this is called retarding the dough and helps in developing flavour. If you’re in a hurry, try this dough recipe instead.)

 Take out the dough from the refrigerator after 8 hours and let it come down to room temperature. In the meantime preheat your oven at 250 degrees Celsius or as hot as you can. Keep a tray or pizza stone on it, something that will serve as a base for your pizza tin.
Once your dough is down to room temp, it’s time to roll it out. But first flour your tin with corn meal, this will keep your base crisp.
Homemade Deep Dish Pizza Homemade Deep Dish Pizza
Now using your hands or a rolling pin stretch one ball of dough until it’s about 1/2 inch thick (keep the other covered while you’re working or it will form a skin on top). Lay it at the base of a springform tin or a loose bottom tin. This is essential unless you’re planning on serving in the dish. In that case you can use a pie dish too. Line the dough on the sides too, much like lining a tart.
Homemade Deep Dish Pizza
Brush the base with some butter and spread your grated mozzarella on it followed by a single layer of toppings. Do not put salt in the toppings or it will release water making your base watery and gooey.
Homemade Deep Dish Pizza
Roll out the other ball of dough and lay it on top of everything and seal the edges. Poke holes in the top layer so that the steam can escape.
Homemade Deep Dish Pizza Homemade Deep Dish Pizza
Layer on the pizza sauce as much as you like, I like a lot of it! And season it if you haven’t already. Top with a few jalapenos for that extra kick.
Homemade Deep Dish Pizza
Bake your pizza in a really really hot oven for about 35-40 minutes or until the sides are nice and golden. I baked mine for 30 minutes but I would suggest you to bake it for those additional 5-10 minutes so that it’s thoroughly cooked.
Homemade Deep Dish Pizza
Serve your pizza right away and enjoy!
Homemade Deep Dish Pizza

Looking for similar recipes? Try these…

Pizza Rolls

Pizza Rolls

Mexican Style Mini Tortilla Pizzas

Mini Tortilla Pizzas- Mexican Style


Classic Margherita Pizza

Classic Margherita Pizza

Homemade Wholewheat Calzone

Wholewheat Calzones

Classic Tomato Sauce

Try this simple recipe with step-by-step pictures and make flavorful fresh tomato sauce for your homemade pizzas! This versatile sauce tastes great with pastas and as a dipping sauce too!

Homemade Pizza Sauce (Improved Version)

There are two types of people on this planet, tomato sauce lovers and cheese sauce lovers. I am the former and for that same reason I’m always on the lookout for great tomato sauce recipes. I have a recipe that I normally use to whip up a simple spaghetti but this sauce is something else. It has no onions or garlic and is closest to the real deal! This Classic Tomato Sauce is great over homemade pizzas, pastas or even a dipping sauce and I got it from the Instapizza, an upcoming pizza chain restaurant in Delhi, India. I loved their pizzas and their sauce so I asked them for the recipe for it. The folks at Instapizza were kind enough to give it to me so here I am sharing it with you! Try this really simple recipe with step-by-step instructions and take your pizzas to another level!

RECIPE: Classic Tomato Sauce

Makes: 2 cups or 500 ml of sauce       Time: 1 hour

INGREDIENTS

  • Fresh Juicy Tomatoes, 7-8
  • Olive Oil, 3 tablespoons
  • Pizza Seasoning, as per taste (My pizza seasoning is a mix of garlic powder, dried rosemary, dried basil, dried thyme and dried oregano; you can season it with your favorite seasoning)
  • Salt, to taste
  • Sugar, 2 teaspoons

METHOD

Start by boiling your tomatoes. Take a pot, fill it water, and bring it to a boil. Toss your tomatoes in it and boil for about 5-10 minutes or until tomatoes are really tender.

Homemade Pizza Sauce (Improved Version)

Once they’re boiled, drop the tomatoes in ice cold water and take their skins off. Once the skins are off, blitz them in a food processor until you have a smooth tomato puree. You can go one step further and sieve the tomato puree to get a super smooth consistency but I don’t bother. I like it rustic.

Homemade Pizza Sauce (Improved Version)DSC_1171

Pour olive oil in a heavy bottomed pan and transfer your tomato puree to it. Bring it to a boil, and then simmer. Let the sauce cook on medium heat for about 20-25 minutes until it has thickened and developed a deeper colour. Keep stirring. Remember, the longer you cook your sauce the better it will taste.

Season your sauce and let it cool before you top it on pizzas, for pastas you can use it straight away. If the sauce is too thick add a little hot water to thin it down and adjust seasoning.

Classic Tomato Sauce

Recipe Courtesy: Instapizza.in


Potato and Chickpea Salad

Try my easy-to-follow recipe and make delicious and creamy Potato and Chickpea Salad at home in no time!

Potato and Chickpea Salad

Every now and then I hear about a new place opening up but only recently I’ve seen a lot salad bars in Delhi popping up! Thank god for places with healthy food in Delhi like Lean Chef, TLC Kitchen and Salad Chef, I can now enjoy good food without the added calories! If you visit these places you’ll be surprised to see how they turn something high cal into something really healthy and trust me they don’t just sell salads, they’ve got desserts too! So it’s not a punishment to eat at these places but rather a delight! Being a food blogger sounds all fancy and people are all like “OMG you’re so lucky, you get to eat all the food” but they forget what that food is doing to my waist! So today I thought of rustling up a really quick recipe of my favourite salad with Potatoes, Chickpeas and Spinach.

Potato and Chickpea Salad

Now the dressing is a mix of mayo, Tahini and hung curd so I won’t say it’s entirely healthy but it’s a great light salad that’s really creamy and delicious! The dressing is to die for and the flavours are pretty much Indian, so I’m sure you’ll find the ingredients in your kitchen. So gather your tools and get started!

Potato and Chickpea Salad

RECIPE: Potato and Chickpea Salad

Serves: 2    Total Time: 10 minutes

INGREDIENTS

For the salad

  • Boiled Chickpeas, 1 cup
  • Boiled potatoes, cut into chunks, 3 small (Make sure you don’t boil them too much, they shouldn’t be too mushy.)
  • Blanched Spinach Leaves, 1/3 cup

For the dressing

  • Mayonnaise, 4-5 tablespoons
  • Tahini Dressing, 2 tablespoons (Tahini paste and tahini dressing are two different things. If you’re using paste, only use about a tablespoon and add a little lemon juice to the recipe.)
  • Hung Curd, 2 tablespoon
  • Salt and Pepper, to taste
  • Cumin Powder, 1 teaspoon
  • Extra Virgin Olive Oil, 2-3 tablespoons
  • Minced Garlic, ½ teaspoon

METHOD

Mix all the ingredients mentioned under “for the dressing” in a bowl. Once mixed, add in the boiled chickpeas, boiled potato chunks and blanched spinach. Make sure the dressing covers everything. Chill the salad before serving and enjoy!

 Looking for similar recipes? Try these..

Spicy Mango Salad

Spicy Mango Salad

Sweetcorn and Pasta Salad

Corn and Pasta Salad


Strawberry and Oreo Cheesecake

My current favorite dessert, this Strawberry and Oreo Cheesecake is easy to prepare, tastes heavenly and will quickly become a family favorite! P.S. – It’s also perfect for beginners in the kitchen! 🙂

Strawberry and Oreo Cheesecake


Two words – Strawberry and Oreos! Can anything in this world top that combination? Maybe chocolate and peanut butter but not after you’ve tasted this cheesecake. 😉 This creamy, no gelatin cheesecake is really simple to make, is no bake and takes less than 10 minutes to prepare (although you need to chill it for 4 hours later). My Strawberry and Oreo Cheesecake tastes heavenly and is bursting with fresh strawberry flavor! Nothing artificial here you guys!! Oh and all you newbies in the kitchen, read on because it’s perfect for you guys!

Strawberry and Oreo CheesecakeStrawberry and Oreo Cheesecake


Like all cheesecakes, my cheesecake too has a biscuit base but to take things to the next level I used Oreos instead of the regular digestives. The taste of Oreos complement the sweetness and slight tartness of the cheesecake. I didn’t remove the cream from the centre so the base is nice and soft! My cheesecake is made of cream cheese and whipping cream, this is a no gelatin cheesecake so all you really have to do is whip some cream and mix it in with cream cheese and icing sugar and VOILA..you have your batter ready! You also need to add some pureed strawberries..the puree shouldn’t be too watery but more on the chunky side. This give the cheesecake that real strawberries flavour. When this is done, you just need to set the mixture in the refrigerator for 4 hours and DONE!

Don’t panic if you’ve never made a cheesecake before because it is ridiculously easy to make! I’ve got lots of process pictures to guide you throughout so you’ll be alright! 🙂

Strawberry and Oreo Cheesecake Strawberry and Oreo Cheesecake


RECIPE: Strawberry and Oreo Cheesecake

Makes: One 8″ Cheesecake    Prep Time: 15 minutes    Chilling Time: 4 hours +

INGREDIENTS

  • Cream Cheese (at room temp), 200 grams (You can use Philadelphia or Britannia)
  • Sweetened Whipping Cream (40% fat or more), 200 grams (I use Rich’s whipping cream)
  • Icing Sugar, 1/2 cup or 60 grams
  • Vanilla Essence, 1/2 teaspoon
  • Fresh Strawberries (Pureed), 8-10 small*
  • Fresh Strawberries, 7-8 sliced, for the top
  • Oreos, 1 pack of 150 grams
  • Melted Butter, 3 tablespoons
  • 8″ Springform tin (or loose bottom tin)
*For the strawberry puree – Blitz strawberries minus the leafy part in a blender until they’ve broken down. The mixture has to be between watery and chunky. Watery puree will make it difficult for the cheesecake to set so make sure you get the consistency right. Refer to the pictures below.

METHOD

Blitz Oreos in a mixer until they’re crumbly and are almost sand like in texture. Add in the melted butter and blitz again. Once the Oreos and butter are properly mixed tip this mixture onto the bottom of a springform tin and press them down to make a nice tight base. Use a spatula or the back of a glass to make the base smooth and flat.

Strawberry and Oreo CheesecakeStrawberry and Oreo Cheesecake


Chill the base in the freezer until you make your cheesecake batter.

Whisk your whipping cream until you have stuff peaks and set it in the refrigerator to be used later.

Strawberry and Oreo Cheesecake

Whisk the cream cheese until it’s nice and fluffy, add in the icing sugar and whisk again. Add in the vanilla essence and mix it in. Now take out the whipped cream you set in the refrigerator and fold it in this cream cheese mixture little by little using a spatula. Make sure you don’t mix very vigorously. Mix enough to combine the cream cheese mixture and whipping cream properly. Now add in the pureed strawberries and fold them in.

Strawberry and Oreo Cheesecake

Make sure your strawberry puree isn’t too watery. Keep it chunky.

Next, take out your base from the refrigerator and pour your batter in it. Chill in the fridge for atleast four hours, preferably overnight.

Once your cheesecake is set, demold it and transfer it to cake plate. To do that, run a knife along the edges and then run it under the base to loosen the base. Once the cake if off the base, simply slip it onto a serving plate. Top with sliced strawberries and serve chilled.

TIP: To get a neat slice every time, clean your knife before making every cut. 

I don’t have any clue how long the cheesecake stays good for because in my house it’s over in no time! Let me know if you know 🙂

Strawberry and Oreo Cheesecake

Looking for similar recipe, try these..

Orange and Strawberry Summer Cake

Orange and Strawberry Summer Cake

Frozen Strawberry Daiquiris

Frozen Strawberry Daiquiri


Strawberry and Banana Smoothie

Strawberry and Banana Smoothie

Lemon Cupcakes with Strawberry FrostingLemon Cupcakes with Strawberry Frosting

Masala Coke Cocktail

Try this simple recipe and turn around a humble glass of coke into something SO good and SO Indian! This Masala Coke cocktail is just what you need at every summer party this year! 🙂

Masala Coke Cocktail


Now before I’m judged let me tell you that I’m almost embarrassed to share this recipe because it’s just too easy to even qualify as a recipe and I bet a lot of Indians even drink your coke this way. This really simple Masala Coke Cocktail recipe is one way to turn around a humble glass of Coke into a refreshing cocktail. It takes less than 5 minutes to put together and less than 5 ingredients..so get started and make it already!

Masala Coke Cocktail Masala Coke Cocktail


RECIPE: Masala Coke Cocktail

Serves: 2      Time: 5 minutes

INGREDIENTS

  • Coca Cola, 500 ml
  • Lemon Juice, 1 tablespoon
  • Chaat Masala, 2 teaspoons
  • Pepper Powder (preferably homemade), 1/2 teaspoon
  • Cumin Powder (preferably homemade), 1/4 teaspoon
  • Vodka, 60ml (optional)

METHOD

Fill a glass with ice, squeeze lemon juice in it and add vodka, chaat masala, pepper powder and cumin powder to it. Top it with coke. Put some lemon slices in and enjoy!

Note: This recipe is very forgiving so you can add (or not add) ingredients. Start with a little bit of everything and see how you like it, and adjust it according to your taste. 

Looking for similar recipes? Try these…

Frozen Strawberry Daiquiri

Frozen Strawberry Daiquiri

Kiwi and Basil Lemonade

Kiwi Basil Lemonade


Homemade Greek Tzatziki Dip

This summer try my recipe for a simple Greek yogurt dip – Tzatziki! It light, creamy and fresh..perfect with fresh vegetables or crackers!

Homemade Tzatziki Dip


What if I told you, you can make something Greek with ingredients that in your refrigerator right now. Ingredients that you probably overlooked as being too simple or too common..well, my recipe for this Greek Tzatziki dip is going to use just those ingredients! It’s as simple as 1,2,3 and takes about 10 minutes in total. It fresh, light and goes great with fresh vegetables, over meats or with crackers! For this dip you need: yogurt, cucumber, garlic, olive oil and lemons..yes just that. So get them ingredients ready and make this dip already!

DSC_1032 Homemade Tzatziki Dip


RECIPE: Homemade Greek Tzatziki Dip

Serves: 2-3     Time: 10 minutes

INGREDIENTS

  • Strained Yogurt (hung curd), 1 cup
  • Olive oil, 2 tablespoons (or mayonnaise; using mayo is not traditional but works well)
  • Grated Cucumber, 1
  • Lemon juice, 1 teaspoon
  • Grated Garlic Cloves, 2
  • Salt and Pepper, to taste
  • Dill, Parsley or Coriander, chopped

METHOD

In a bowl mix yogurt and olive oil until you get a creamy consistency. Add the remaining ingredients and adjust the taste as per your liking. Serve with carrots and cucumbers or crackers. This dip goes well with lamb dishes as well so serve it as a side dip for meats too.

Looking for similar recipes? Try these..

Homemade Guacamole (Mexican Avocado Dip)

Homemade Guacamole

Mango SalsaMango Salsa Summer

Orange and Strawberry Summer Cake

This orange and strawberry cake is perfect to welcome summers and bid adieu to the glorious strawberry season! Tangy and sweet, this is a perfect tea time cake!

Orange and Strawberry Summer CakeOrange and Strawberry Summer Cake

Winters have ended which means no more strawberries in India (well Delhi at least) and you have no idea how sad that makes me. My favorite ingredient is no longer in season and I have to wait a WHOLE YEAR to start baking with it. It’s heart breaking to be honest! So I thought why bake something that will do justice to my favourite berry and mark the beginning of the season I dread the most with something ever so marvelous as this Orange and Strawberry Summer Cake.

Orange and Strawberry Summer Cake

Luckily I come from a city that has a lot fabulous bakeries. If I had to pick my favorite bakeries in Delhi or cake shops in Delhi..I couldn’t! It’s so hard to pick just a few when every place has its own identity and own specialty. Elma’s is famous for its red velvet cake and high tea (highly recommended), L’opera for its almond croissant, Defence Bakery for its breads, Theos, Angels in My Kitchen and  Whipped for their cakes, Sugarama for its decadent macarons and last but not least Wengers for almost everything!  Oh and let’s not forget the new kid on the block..The Big Chill Cakery by same old The Big Chill Café that we have all come to love so much! That place is the new go to place for all cake lovers in Delhi because of its delectable spread of desserts. Now who can pick just one? All I can say if you’re looking for me this summer..you’ll find me in one of the bakeries in Delhi enjoying a piece of cake, hopefully with strawberries!

Orange and Strawberry Summer Cake Orange and Strawberry Summer Cake

Back to my Orange and Strawberry Summer Cake..this cake is eggless but still as soft and moist as a cake with egg. It’s everything you need this summer to refresh you and give you that burst of fruits! The cake base is a sweet and tangy orange cake which is softer than marshmallows (well almost :p) with fresh strawberries in the centre and on top! Now this recipe makes one 6” cake but the same batter can make a 7” cake too. This cake takes about 45 minutes to bake because it’s really high but if you have a bigger tin the baking time will reduce because naturally the batter will spread making a thinner cake. If you didn’t know already, baking time depends on the height of the cake and not the diameter, a cake with a 6” diameter but 2.5” height will take longer to baker than a 8”x2” cake. So make sure you adjust the time according to your tin.

This cake is a bakers dream really! Get your tools ready and get baking because strawberries ain’t gonna wait for no one..haha ! 😀

RECIPE: Orange and Strawberry Summer Cake

Make: One 6” cake   Prep Time: 20 minutes   Baking Time: 45 minutes

INGREDIENTS

  • All purpose flour (maida), 1 ¼ cup or 160 grams approx.
  • Baking powder, 1 teaspoon
  • Softened butter, ½ cup or 100 grams
  • Caster sugar, ½ cup or 100 grams approx.
  • Buttermilk, ½ cup or 120 ml (learn how to make instant buttermilk below)
  • Orange zest, of 1 orange
  • Fresh orange juice, 4 tablespoons
  • Vanilla essence, 1 teaspoon
  • Strawberries, 5-6 (sliced in half)
  • Strawberries, 7-8 (chopped in cubes)
To make buttermilk take a cup of milk (or 240ml) and heat it, once it reaches a boil add a tablespoon of lemon juice to it. Boil the milk until it curdles, then sieve out the curdled part and use the remaining liquid as buttermilk. Let it cool down completely before you use it.

METHOD

Grease a 6” round baking tin and line it with butter or parchment paper.

Preheat oven to 200 degrees Celsius for 10 minutes.

Whisk butter until light and fluffy for a couple of minutes then add in the caster sugar and vanilla essence and whisk again until everything is creamed together.

Add in the orange zest and orange juice, mix it in.

Sieve in the flour and baking powder directly in the bowl with wet ingredients. Add in the buttermilk little by little; do not whisk it, only mix using a spatula very lightly until you no longer see dry flour. The batter will be slightly thin but that’s okay! Add chopped strawberries to the batter and mix.  Pour the batter in the prepared tin and top the batter with sliced strawberries. Bake for 40-45 minutes or until the cake is done at 180 degrees Celsius. If you’re using a bigger tin reduce the baking time (read the post above for details).

Let the cake to cool completely before you take it out of the tin. Serve with tea, store in an air tight container in the refrigerator for up to a week.

Looking for similar recipes? Try these..

Lemon Cupcakes with Strawberry Frosting

Lemon Cupcakes with Strawberry Frosting

Lemon and Blueberry Loaf Cake

Lemon and Blueberry Loaf Cake

Lemon Drizzle Cake

Eggless Lemon Drizzle Cake

Creamy Mushroom Pasta

A really simple recipe to make pasta in a creamy mushroom sauce with hints of garlic. Perfect comfort food, this recipe is great for novice cooks!

Creamy Mushroom Pasta

What do you eat when you need to eat something soulful? Resort to chocolates? Well, I rustle up a simple pasta dish and gorge on it like no one’s watching. Making a good pasta dish is not rocket science, a handful of ingredients and you have a plate full of comfort food ready. My Creamy Mushroom Pasta is just that, it’s something I eat all the time. Simple, quick and yes..soul satisfying. ❤

This recipe has a LOT of fat..butter, cream, cheese..you name it and this has it, so if you’re on a diet look away now because this sir, is not for you. It’s for those that need some fixing of the heart. Let’s just say you’ve had your had your heart broken -> this pasta dish is for you..there’s an empty void in your heart that needs filling -> this is for you..you need to feel loved -> this is for you..you’re looking to fit into skinny jeans -> NOT for you. Don’t say I didn’t warn you. P.S. – if you want to really cheat on your cheat day, do it with this recipe. You will thank me!

Creamy Mushroom PastaCreamy Mushroom Pasta


My creamy mushroom pasta recipe requires very little effort, so make it when you feel like lazying around all day in your PJs! The best part is that it tastes even better the next day..so make some extra and store it! And if you don’t fall in love with this recipe..write to me..I want to know you because I haven’t met a person capable of hating this dish. 😉

RECIPE: Creamy Mushroom Pasta

Serves: 2     Cooking Time: 15 minutes

INGREDIENTS

  • Dry Pasta, 2 cups (I used fusilli)
  • Olive Oil, 3 tablespoons
  • Butter, 1+1/2 tablespoon
  • Garlic Cloves, 5-6 large, chopped
  • Mushrooms, 8-10 sliced
  • Single Cream, 2/3 cup or 160 ml ( I used D’lecta Creme 25%; available at Nature’s Basket)
  • Grated Cheddar Cheese, 1/3 cup
  • Salt, pepper, dried oregano, as per taste

METHOD

In a large pan, boil water with some salt. Once it reaches a roaring boil, throw in the dry pasta and cook until the pasta is done. Sieve it and set the pasta aside to be used later. Save some pasta water for the sauce.

In another pan, heat olive oil and butter and toss in the chopped garlic. Fry the garlic on medium flame until golden in  color. Add in the sliced mushrooms. Make sure you take a large pan otherwise the mushrooms will be too crowded and they won’t cook well.


Fry mushrooms until golden with slightly brown edges. Add in the cream and grated cheese along with the seasonings. Cook on low flame until the cheese melts, add in a little pasta water that you reserved to thin down the sauce if required.

Mix the pasts in this sauce and cook for a couple of minutes until properly mixed.

Serve hot with some garlic bread.

Creamy Mushroom Pasta


Looking for similar recipes? Try these…

Spaghetti with garlic, olive oil and chilli flakes

Spaghetti with Garlic, Olive Oil and Chili Flakes


Roasted Red Pepper Pomodoro Pasta

Roasted Red Pepper Pomodoro Pasta


Red Velvet Chocolate Chip Cookies

An easy-to-follow recipe for super chewy and soft red velvet cookies loaded with chocolate chips!

Red Velvet Chocolate Chip Cookies


It’s not Christmas, not even Valentine’s Day, but these cookies remind of a festive time! My Red Velvet Chocolate Chip cookies are really chewy (like all my cookies) and would definitely be your favorite type of cookies if you’re a lover of all things red velvet. They’re super soft and moist from the inside, and filled with the goodness of white chocolate chips. Let’s just say these are going to be your buddies when you’re feeling down. 😉

Red Velvet Chocolate Chip Cookies


Because these cookies look sooo good I went crazy taking their pictures, you won’t believe it but I have close to a 100 shots of them in different angles! They certainly look like a treat and will go down really well with people with a cup of tea or coffee (I suggest coffee 😉 ). The recipe is fairly simple and starts like all my cookies, with a simple cookie dough. However, unless all my cookies you don’t need to chill the dough.

I decided to not chill the dough this time to save on time and baked these right away, surprisingly, despite being on the room temp the cookie dough didn’t spread as much and the cookies were perfectly crunchy on the top and chewy in the middle. All in all I had a batch of 16 cookies ready in 30 minutes! These are quick, easy and taste fabulous, need more convincing? 😀

Red Velvet Chocolate Chip Cookies


RECIPE: Red Velvet Chocolate Chip Cookies

Makes: 16 cookies    Prep Time: 15 minutes      Baking Time: 9-10 minutes

INGREDIENTS

  • Flour, 1 cup or 130 grams
  • Cocoa Powder, 3 tablespoons
  • Baking Powder, 1 teaspoon
  • Salt, 1/3 teaspoon
  • Butter, 100 grams
  • Powdered Sugar, 100 grams
  • Vanilla Essence, 1 teaspoon
  • Red Food Color (Liquid= 1+1/2 tablespoon; Gel= a few drops)
  • Milk, 2 tablespoons
  • Chocolate Chips, 1/2 cup

METHOD

Preheat the oven to 180 degrees Celsius for about 10 minutes. Line a baking tray with parchment or butter paper and set aside.

In a bowl, whisk butter and sugar together for about a few minutes until they’re properly combined. Add in the vanilla essence and mix again.

In a small bowl, mix milk and red food colour together and mix them with the butter sugar mix.

Now sift in all the dry ingredients, flour, cocoa powder, baking powder and salt into this bowl and mix. Get the dough together with the help of a spatula. If the dough seems dry add in a tablespoon or two of milk. Add in the chocolate chips.

The dough should look something like this. Neither too wet nor too dry.

Red Velvet Chocolate Chip Cookies


Now take a tablespoon of dough per cookie, make a ball and flatten it slightly. You should have about 16 cookies in the end. Line the cookie dough balls on the baking tray about 1 inch away from each other. These will spread but not too much.

Bake the cookies for 10 minutes at 180 degress Celsius. The cookies will look really soft when you take them out, do not lift them right away. Let the cookies cool down for atleast 10 minutes before you transfer them to a baking tray.

If your oven is small, you can bake these in batches too.

Red Velvet Chocolate Chip Cookies


Looking for similar recipes? Try these…

Red Velvet Chocolate Swirl Brownie Bars

Red Velvet Chocolate Swirl "Brownie" Bars


Half and Half Chocolate Chip Cookies


Half and Half Chocolate Chip Cookies

1 Giant Chocolate Chip Sprinkle Cookie

Giant Dark Chocolate Chip Sprinkle Cookie